Using Build Class we will get the details of the mobile like device name, device info...
Build . MODEL ---- The visible device name.
Build . PRODUCT --- The name of the overall product.
Build . MANUFACTURER -- The manufacturer of the product.
For More Details about this class go through the link.
http://developer.android.com/reference/android/os/Build.html
July 09, 2011
July 08, 2011
Code Sample for Downlaoding Image via Internet in Android
public Bitmap downloadImageFromWeb(String url)
{
Bitmap bitmap = null;
InputStream in;
try
{
//Creation of url
URL url_img = new URL(url);
//Establishing Connection
in = url_img.openStream();
//Converting input stream to bitmap
bitmap = BitmapFactory.decodeStream(in);
//Closing the input stream
in.close();
}
catch (MalformedURLException e)
{
e.printStackTrace();
}
catch (IOException e)
{
e.printStackTrace();
}
return bitmap;
}
{
Bitmap bitmap = null;
InputStream in;
try
{
//Creation of url
URL url_img = new URL(url);
//Establishing Connection
in = url_img.openStream();
//Converting input stream to bitmap
bitmap = BitmapFactory.decodeStream(in);
//Closing the input stream
in.close();
}
catch (MalformedURLException e)
{
e.printStackTrace();
}
catch (IOException e)
{
e.printStackTrace();
}
return bitmap;
}
July 06, 2011
Android Code Sample for XML DomParsing using HashMap
You can use the sample given below for testing how to parse a xml using DomParsing and can get a clear idea to use it on your work.
parse.xml :
<Books>
<Book>
<Name>Cryptography</Name>
<Author>Harish</Author>
<Price>$200</Price>
</Book>
<Book>
<Name>Android</Name>
<Author>Harish</Author>
<Price>$250</Price>
</Book>
</Books>
Method to parse xml using dom :
public HashMap doDomParsing(String strUrl, String strParent, String[] child)
{
HashMap hmap, hmapchild = null;
URL url;
hmap = new HashMap();
try
{
//url = new URL(strUrl);
DocumentBuilderFactory dbf = DocumentBuilderFactory.newInstance();
DocumentBuilder db = dbf.newDocumentBuilder();
NodeList nodeList = doc.getElementsByTagName("item");
for (int i = 0; i < nodeList.getLength(); i++)
{
Node node = nodeList.item(i);
NodeList properties = node.getChildNodes();
hmapchild = new HashMap();
for(int j=0 ; j < properties.getLength() ; j++)
{
Node property = properties.item(j);
String nodename = property.getNodeName();
Log.e("Node NAME", nodename);
for(int inew =0 ;inew < child.length ; inew++)
{
if(nodename.equalsIgnoreCase(child[inew]))
{
hmapchild.put(nodename, property.getFirstChild().getNodeValue());
}
}
}
hmap.put(i, hmapchild);
}
}
catch (Exception e)
{
// TODO Auto-generated catch block
e.printStackTrace();
}
return hmap;
}
For this method we have to pass three parameters.
URL
PARENT NODE
CHILDREN
For the above xml we are parsing local file presented at raw folder. so url is empty.
Parent is Book
child array is {Name, Author, Price}
That's it. It will parse the data store the values in Hash Map and returns that Hash Map.
parse.xml :
<Books>
<Book>
<Name>Cryptography</Name>
<Author>Harish</Author>
<Price>$200</Price>
</Book>
<Book>
<Name>Android</Name>
<Author>Harish</Author>
<Price>$250</Price>
</Book>
</Books>
Method to parse xml using dom :
public HashMap doDomParsing(String strUrl, String strParent, String[] child)
{
HashMap hmap, hmapchild = null;
URL url;
hmap = new HashMap();
try
{
//url = new URL(strUrl);
DocumentBuilderFactory dbf = DocumentBuilderFactory.newInstance();
DocumentBuilder db = dbf.newDocumentBuilder();
Document doc = db.parse(new InputSource(getClass().getResourceAsStream("/res/raw/parse.xml")));
NodeList nodeList = doc.getElementsByTagName("item");
for (int i = 0; i < nodeList.getLength(); i++)
{
Node node = nodeList.item(i);
NodeList properties = node.getChildNodes();
hmapchild = new HashMap();
for(int j=0 ; j < properties.getLength() ; j++)
{
Node property = properties.item(j);
String nodename = property.getNodeName();
Log.e("Node NAME", nodename);
for(int inew =0 ;inew < child.length ; inew++)
{
if(nodename.equalsIgnoreCase(child[inew]))
{
hmapchild.put(nodename, property.getFirstChild().getNodeValue());
}
}
}
hmap.put(i, hmapchild);
}
}
catch (Exception e)
{
// TODO Auto-generated catch block
e.printStackTrace();
}
return hmap;
}
For this method we have to pass three parameters.
URL
PARENT NODE
CHILDREN
For the above xml we are parsing local file presented at raw folder. so url is empty.
Parent is Book
child array is {Name, Author, Price}
That's it. It will parse the data store the values in Hash Map and returns that Hash Map.
How to Automatically Start an Android Service after Reboot
Always a service is started by us manually that means it was not start by default. If we switch off the mobile then all the running services will stop.
For example if we are running a service. If we reboot the mobile then all the running services are stopped. So we have to run the service again.
By default android broadcasts a intent (android.intent.action.BOOT_COMPLETED)at the time of booting. So we have to receive that and in that we again start a service.
This should be accomplished by using BroadCast Receiver.
import android.content.BroadcastReceiver;
import android.content.Context;
import android.content.Intent;
import android.util.Log;
public class BootBroadcastReceiver extends BroadcastReceiver
{
public void onReceive(Context context, Intent intent)
{
Log.i("Receiver Called.", "start the service.");
}
}
We have to add this receiver in the manifast.xml. The code is as follows.
<!-- Receiver -->
<receiver android:name=".BootBroadcastReceiver">
<intent-filter>
<action android:name="android.intent.action.BOOT_COMPLETED" />
<category android:name="android.intent.category.HOME" />
</intent-filter>
</receiver>
July 02, 2011
How to Get Current Location of User in Android
In Android Three Approaches are preferred to Get Current Location
-> Using GPS
-> Cell - Id
-> Wi-Fi
The above three gives a clue to get the current location. Gps gives the results accurately. But it consumes Battery. Android Network Location Provider get the current location based wifi signals and cell tower. We have to use both or a single to Get the Current Location
LocationManager myManager;
MyLocListener loc;
loc = new MyLocListener();
myManager = (LocationManager) context.getSystemService(Context.LOCATION_SERVICE);
myManager.requestLocationUpdates(LocationManager.GPS_PROVIDER, 0, 0, loc );
package com.gps.activities;
import android.location.Location;
import android.location.LocationListener;
import android.os.Bundle;
public class MyLocListener implements LocationListener{
//Here you will get the latitude and longitude of a current location.
@Override
public void onLocationChanged(Location location)
{
if(location != null)
{
Log.e("Latitude :", ""+location.getLatitude());
Log.e("Latitude :", ""+location.getLongitude());
}}
@Override
public void onProviderDisabled(String provider) {
// TODO Auto-generated method stub
}
@Override
public void onProviderEnabled(String provider) {
// TODO Auto-generated method stub
}
@Override
public void onStatusChanged(String provider, int status, Bundle extras) {
// TODO Auto-generated method stub
}
}
Note: Include the below permissions in manifast.xml to listen Location Updates.
<uses-permission android:name="android.permission.ACCESS_FINE_LOCATION" />
<uses-permission android:name="android.permission.ACCESS_COARSE_LOCATION"/>Note : If you want more details about Obtaining User Location/ Get User Location
refer the below link. http://developer.android.com/guide/topics/location/obtaining-user-location.html
June 28, 2011
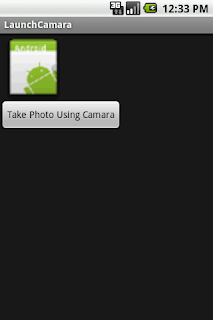
How to Attach Images after Launching Camera in Android
public void takePhoto()
{
//Intent to launch camara
Intent intent = new Intent(MediaStore.ACTION_IMAGE_CAPTURE);
//Uri creattion to strore images
mImageCaptureUri = Uri.fromFile(new File(Environment.getExternalStorageDirectory()+ "/" + String.valueOf(System.currentTimeMillis())+ ".jpg"));
intent.putExtra(android.provider.MediaStore.EXTRA_OUTPUT, mImageCaptureUri);
startActivityForResult(intent, 1);
}
protected void onActivityResult(int requestCode, int resultCode, Intent imageReturnedIntent)
{
super.onActivityResult(requestCode, resultCode, imageReturnedIntent);
if(requestCode == 1)
{
if(resultCode == RESULT_OK)
{
try
{
ivPhoto.setBackgroundResource(0);
ivPhoto.setImageBitmap(BitmapFactory.decodeStream(new FileInputStream(new File(mImageCaptureUri.getPath()))));
}
catch (FileNotFoundException e)
{
e.printStackTrace();
}
}
else if(resultCode == RESULT_CANCELED)
{
Log.d("Result: ", "Launch Cancelled.");
}
}
}


{
//Intent to launch camara
Intent intent = new Intent(MediaStore.ACTION_IMAGE_CAPTURE);
//Uri creattion to strore images
mImageCaptureUri = Uri.fromFile(new File(Environment.getExternalStorageDirectory()+ "/" + String.valueOf(System.currentTimeMillis())+ ".jpg"));
intent.putExtra(android.provider.MediaStore.EXTRA_OUTPUT, mImageCaptureUri);
startActivityForResult(intent, 1);
}
protected void onActivityResult(int requestCode, int resultCode, Intent imageReturnedIntent)
{
super.onActivityResult(requestCode, resultCode, imageReturnedIntent);
if(requestCode == 1)
{
if(resultCode == RESULT_OK)
{
try
{
ivPhoto.setBackgroundResource(0);
ivPhoto.setImageBitmap(BitmapFactory.decodeStream(new FileInputStream(new File(mImageCaptureUri.getPath()))));
}
catch (FileNotFoundException e)
{
e.printStackTrace();
}
}
else if(resultCode == RESULT_CANCELED)
{
Log.d("Result: ", "Launch Cancelled.");
}
}
}
Call takePhoto() in the button click.
Note:
In the manifast.xml we have to add permissions.android.permission.WRITE_EXTERNAL_STORAGE
android.hardware.camera
Output:


June 24, 2011
How to Remove Dull Background on Active Android Application
While running progress dialog the screen becomes dull. In order to avoid that blur the following code will helpful.
Here i am applying properties to our progress dialog. In this example "lp.dimAmount:" is the attribute to set the dim amount .
pdlg = ProgressDialog.show(getParent(), "", "Loading..");
//Setting the properties
WindowManager.LayoutParams lp = pdlg.getWindow().getAttributes();
lp.dimAmount=0.0f;
//Applying to the screen
pdlg.getWindow().setAttributes(lp);
June 12, 2011
How to Prevent Screen Lock in Android while Running Application
To prevent lock while running the application can be done two ways.
->PowerManager
->WindowManager
Using Power Manager is not a good way. They easily drain battery. So using Window Manager we can avoid the screen locking while application is running. Add the below snippet in your activity to avoid screen lock :
getWindow().addFlags(WindowManager.LayoutParams.FLAG_KEEP_SCREEN_ON);
No permissions required. Put the above code in the activity.
June 11, 2011
Checking Availability of Internet from Android
The following method returns true if internet is available and false if not available.
public boolean checkInternetAvailablity()
{
ConnectivityManager cm = (ConnectivityManager)getSystemService(Context.CONNECTIVITY_SERVICE);
return cm.getActiveNetworkInfo().isConnected();
}
public boolean checkInternetAvailablity()
{
ConnectivityManager cm = (ConnectivityManager)getSystemService(Context.CONNECTIVITY_SERVICE);
return cm.getActiveNetworkInfo().isConnected();
}
June 01, 2011
How to Show Download Progress Dialog in Android
In your application u want to get the data from the server. In this example i am putting all that parsing logic in a thread and showing progress dialog while loading the data. After getting all the data i am dismissing the dialog.
The following example illustrates the same ...
public void parsing()
{
ProgressDialog pdlg ;
//SHOWING DIALOG
pdlg = ProgressDialog.show(getParent(), "", "Loading..");
Thread thr_parsing = new Thread()
{
public void run()
{
//do the parsing
runOnUiThread(new Runnable()
{
@Override
public void run()
{
//DISMISSING THE DIALOG
pdlg.dismiss();
}
});
}
};
thr_parsing.start();
}
May 22, 2011
How to Pass Intent to Browser in Android
Intent intent = new Intent("android.intent.action.VIEW", Uri.parse(stringurl));
startActivity(intent);
startActivity(intent);
May 17, 2011
How to Hide Title Bar in Android Application
To hide the title bar through out application we have to include android:theme attribute to application tag in the Andriod Manifast.xml
Then in entire application title bar was not visible.
<application android:name="TestApplication" android:theme="@android:style/Theme.NoTitleBar">
Then in entire application title bar was not visible.
May 15, 2011
How to Get Current Screen Orientation In Android
The following example gives the current screen orientation.
public int getScreenOrientation()
{
return getResources().getConfiguration().orientation;
}
The above method return integer. We will compare as follows.
if(getScreenOrientation() == Configuration.ORIENTATION_PORTRAIT)
{
//App is in Portrait mode
}
else
{
//App is in LandScape mode
}
public int getScreenOrientation()
{
return getResources().getConfiguration().orientation;
}
The above method return integer. We will compare as follows.
if(getScreenOrientation() == Configuration.ORIENTATION_PORTRAIT)
{
//App is in Portrait mode
}
else
{
//App is in LandScape mode
}
May 11, 2011
How to Check Availability of Wi-Fi through Android
The following method Return whether Wi-Fi is enabled or disabled.
True if enabled otherwise false.
public boolean checkWIFI()
{
WifiManager wm = (WifiManager) getSystemService(Context.WIFI_SERVICE);
return wm.isWifiEnabled();
}
True if enabled otherwise false.
public boolean checkWIFI()
{
WifiManager wm = (WifiManager) getSystemService(Context.WIFI_SERVICE);
return wm.isWifiEnabled();
}
April 21, 2011
How to Get the ID of the Device Running Android OS
TelephonyManager is the predefined class that provides information about telephony services on the device. This class contain several methods. You can found complete documentation about this class using the following url
http://developer.android.com/reference/android/telephony/TelephonyManager.html
TelephonyManager tm = (TelephonyManager)getSystemService(Context.TELEPHONY_SERVICE);
//Getting Device Id
tm.getDeviceId();
//Getting the Phone No
tm.getLine1Number();
http://developer.android.com/reference/android/telephony/TelephonyManager.html
TelephonyManager tm = (TelephonyManager)getSystemService(Context.TELEPHONY_SERVICE);
//Getting Device Id
tm.getDeviceId();
//Getting the Phone No
tm.getLine1Number();
April 15, 2011
How to Handle Orientation in Android using OnConfiguration
If you want to perform some operation in the orientation the following code sample will be useful. If you change the orientation then one default method will call i.e onConfigurationChanged()
@Override
public void onConfigurationChanged(Configuration newConfig)
{
super.onConfigurationChanged(newConfig);
if(newConfig.orientation == Configuration.ORIENTATION_LANDSCAPE)
{
// indicates orientation changed to landscape
}
else if(newConfig.orientation == Configuration.ORIENTATION_PORTRAIT)
{
// indicates orientation changed to portrait
}
}
Note :
We will change the declaration of the Activity in manifast.xml to the following :
<activity android:name=".YourActivity" android:label="@string/app_name" android:configChanges="orientation|keyboardHidden" />
If you want know more information about this plz follow the link :
http://developer.android.com/guide/topics/resources/runtime-changes.html#HandlingTheChange
March 09, 2011
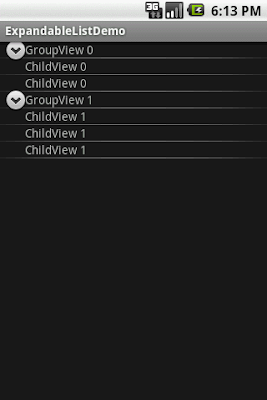
How to Develop Expandable Lists on Android
A view that shows items in a vertically scrolling two-level list. This differs from the ListView by allowing two levels: groups which can individually be expanded to show its children. The items come from the ExpandableListAdapter associated with this view.
Steps to develop Expandable List :
-> Initialize the Expandable List View
-> Construct the Expandable List Adapter
-> Set the Adapter to Expandable List View
Initialize the Expandable List View
ExpandableListView explvList;
explvList = (ExpandableListView)findViewById(R.id.explvList);
Construct the Expandable List Adapter
public class ExpLvAdapter extends BaseExpandableListAdapter
{
@Override
public Object getChild(int groupPosition, int childPosition)
{
return childPosition;
}
@Override
public long getChildId(int groupPosition, int childPosition)
{
return childPosition;
}
@Override
public View getChildView(int groupPosition, int childPosition, boolean isLastChild, View convertView, ViewGroup parent)
{
TextView tv = null;
tv = new TextView(Home.this);
tv.setText("ChildView "+groupPosition);
tv.setPadding(30, 0, 0, 0);
return tv;
}
@Override
public int getChildrenCount(int groupPosition)
{
return children[groupPosition].length;
}
@Override
public Object getGroup(int groupPosition)
{
return groupPosition;
}
@Override
public int getGroupCount()
{
return 2;
}
@Override
public long getGroupId(int groupPosition)
{
return groupPosition;
}
@Override
public View getGroupView(int groupPosition, boolean isExpanded,
View convertView, ViewGroup parent)
{
TextView tv = null;
tv = new TextView(Home.this);
tv.setText("GroupView "+groupPosition);
tv.setPadding(30, 0, 0, 0);
return tv;
}
@Override
public boolean hasStableIds()
{
return false;
}
@Override
public boolean isChildSelectable(int groupPosition, int childPosition)
{
return true;
}
}
Set the Adapter to Expandable List View
explvList.setAdapter(new ExpLvAdapter());
Output:

March 06, 2011
Installing Android Applications on your Mobile
In order to install android application on your device there are 2 Ways.
-> Directly from Android Market Place
-> Manually if We have .apk file
Directly form Android Market Place:
Go to below link (Link to Android Market place). There you find lot of categorized applications. From that you will directly found install option.
https://market.android.com/
Manually if we have apk file:
-> Copy the apk file into SDCARD
->Install third party applications like Astro File Manager, Application Installer if you mobile do not contain any default Application Installer.
https://market.android.com/details?id=com.metago.astro&feature=search_result (Link to Astro File Manager)
->After installing the app open the app.
->It list all the apps in the sdcard.
->Click on the that u want to install.
->There you found install button.
That's it.
February 14, 2011
Android Application Menu Types
Android supports 3 types of Application Menus. Those are
1. Options Menu
2. Context Menu
3. Sub Menu
Options Menu :
It is a collection of Menu items which will appear when the user invokes "Menu" button on the Android device.
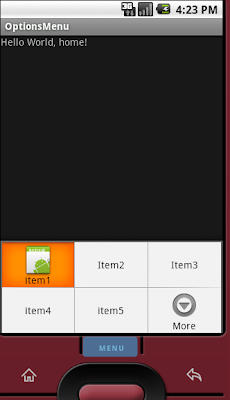 Example for Options Menu
If the item count is <= 6 then all those are displayed properly.
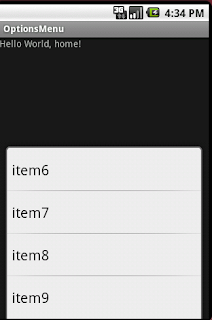
If the item count is >6 then more button will appear default. If we press on the more button then remaining items will appear as shown below.
1. Options Menu
2. Context Menu
3. Sub Menu
Options Menu :
It is a collection of Menu items which will appear when the user invokes "Menu" button on the Android device.

If the item count is <= 6 then all those are displayed properly.
If the item count is >6 then more button will appear default. If we press on the more button then remaining items will appear as shown below.

Context Menu :
Context Menu is the menu which is similar to right click on your desktop computer. It means it will raise when the user tap or click on a list item it will display a menu.
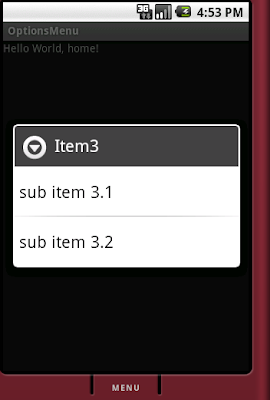
Sub Menu :
It is also a list of menu item that will appear if the user selects item in the menu item contains a nested list of menu.
For example item 3 is having a Sub Menu.

Sub Menu
If you want more detail about Menus go through the following link
February 09, 2011
Storing Persistent data in Android using Shared Preferences
In android we have more ways to store persistent data. Shared Preferences is one of the way to store primitive private data.
Shared Preferences store data in the form of key value pairs. Using shared preferences we can store string, booleans, float, int, long etc. Shared Preferences store data until app uninstallation.
Example:
//Reading values from the Preferences
Note:
After modification we have to commit the values. Otherwise the values are not modified.
Shared Preferences store data in the form of key value pairs. Using shared preferences we can store string, booleans, float, int, long etc. Shared Preferences store data until app uninstallation.
Example:
//Reading values from the Preferences
SharedPreferences prefs = getSharedPreferences("Pref_Name", MODE_WORLD_READABLE);
int StoredDealNumber = prefs.getInt("Key", 0);
In order modify data in preferences we have to use Editor.
//Modification of the Preferences
SharedPreferences prefs = getSharedPreferences("Pref_Name", MODE_WORLD_WRITEABLE);
SharedPreferences.Editor Prefeditor = prefs.edit();
Prefeditor .putInt("no", 1); // value to store
Prefeditor .commit();
Note:
After modification we have to commit the values. Otherwise the values are not modified.
February 04, 2011
Android OS Features
Android is an operation system for the mobile devices. Android SDK (Software Development Kit) provides tools and API's to develop applications on the Android Platform.
Android Applications are developed using Java Programing language.
Features:
Good Development Environment
Application Frame Work
Dalvik Virtual Machine
Graphics
Gps (Globel Positioning System)
Media Support
GSM (Global System For Mobile)
Blue Tooth
Camera
Edge, Wi-Fi, 3G (Dependent On Hardware)
Integrated Browser
Note:
If you want more details about the content visit
http://developer.android.com/guide/basics/what-is-android.html
January 29, 2011
Running a Android Application in Full Screen Mode
In order to run the application in full screen mode you should add the following code to your activity.
getWindow().setFlags(WindowManager.LayoutParams.NO_STATUS_BAR_FLAG,
WindowManager.LayoutParams.NO_STATUS_BAR_FLAG);
getWindow().setFlags(WindowManager.LayoutParams.NO_STATUS_BAR_FLAG,
WindowManager.LayoutParams.NO_STATUS_BAR_FLAG);
January 28, 2011
How to Check the Existence of SD Card in Android
The below method returns true if the sd card is present on the mobile else it returns false.
public static boolean isSdPresent()
{
return android.os.Environment.getExternalStorageState().equals(android.os.Environment.MEDIA_MOUNTED); }
public static boolean isSdPresent()
{
return android.os.Environment.getExternalStorageState().equals(android.os.Environment.MEDIA_MOUNTED); }
January 26, 2011
Code Sample to Create Custom Dialog in Android
I provided a sample of android code to create a custom dialog in android. Save the code in different java and xml files as given below before running the code:
cdialog.xml:
<?xml version="1.0" encoding="utf-8"?>
<LinearLayout
xmlns:android="http://schemas.android.com/apk/res/android"
android:layout_width="200dip"
android:orientation="vertical"
android:padding="5dip"
android:layout_height="fill_parent">
<TextView
android:layout_width="fill_parent"
android:text="Dialog Title"
android:gravity="center_vertical"
android:layout_height="20dip">
</TextView>
<TextView
android:layout_width="fill_parent"
android:layout_marginTop="5dip"
android:background="#FFFFFF"
android:layout_height="0.5sp">
</TextView>
<TextView
android:layout_width="fill_parent"
android:text="Dialog Message"
android:gravity="center_vertical"
android:layout_height="50dip">
</TextView>
<Button
android:layout_width="wrap_content"
android:layout_height="wrap_content"
android:text="OK"
android:id="@+id/btnOk"
android:layout_gravity="center">
</Button>
</LinearLayout>
main.xml:
<?xml version="1.0" encoding="utf-8"?>
<LinearLayout xmlns:android="http://schemas.android.com/apk/res/android"
android:orientation="vertical"
android:layout_width="fill_parent"
android:layout_height="fill_parent">
<Button
android:layout_width="wrap_content"
android:layout_height="wrap_content"
android:id="@+id/btnDialog"
android:text="ShowDialog">
</Button>
</LinearLayout>
CustomDialog.java:
package com.customdialog.home;
import android.app.Dialog;
import android.content.Context;
import android.os.Bundle;
import android.view.Window;
public class CustomDialog extends Dialog
{
public CustomDialog(Context context)
{
super(context);
}
public void onCreate(Bundle savedInstanceState)
{
super.onCreate(savedInstanceState);
requestWindowFeature(Window.FEATURE_NO_TITLE);
setContentView(R.layout.cdialog);
}
}
<?xml version="1.0" encoding="utf-8"?>
<LinearLayout
xmlns:android="http://schemas.android.com/apk/res/android"
android:layout_width="200dip"
android:orientation="vertical"
android:padding="5dip"
android:layout_height="fill_parent">
<TextView
android:layout_width="fill_parent"
android:text="Dialog Title"
android:gravity="center_vertical"
android:layout_height="20dip">
</TextView>
<TextView
android:layout_width="fill_parent"
android:layout_marginTop="5dip"
android:background="#FFFFFF"
android:layout_height="0.5sp">
</TextView>
<TextView
android:layout_width="fill_parent"
android:text="Dialog Message"
android:gravity="center_vertical"
android:layout_height="50dip">
</TextView>
<Button
android:layout_width="wrap_content"
android:layout_height="wrap_content"
android:text="OK"
android:id="@+id/btnOk"
android:layout_gravity="center">
</Button>
</LinearLayout>
main.xml:
<?xml version="1.0" encoding="utf-8"?>
<LinearLayout xmlns:android="http://schemas.android.com/apk/res/android"
android:orientation="vertical"
android:layout_width="fill_parent"
android:layout_height="fill_parent">
<Button
android:layout_width="wrap_content"
android:layout_height="wrap_content"
android:id="@+id/btnDialog"
android:text="ShowDialog">
</Button>
</LinearLayout>
CustomDialog.java:
package com.customdialog.home;
import android.app.Dialog;
import android.content.Context;
import android.os.Bundle;
import android.view.Window;
public class CustomDialog extends Dialog
{
public CustomDialog(Context context)
{
super(context);
}
public void onCreate(Bundle savedInstanceState)
{
super.onCreate(savedInstanceState);
requestWindowFeature(Window.FEATURE_NO_TITLE);
setContentView(R.layout.cdialog);
}
}
Home.java:
package com.customdialog.home;
import android.app.Activity;
import android.os.Bundle;
import android.view.View;
import android.view.View.OnClickListener;
import android.widget.Button;
public class Home extends Activity
{
/** Called when the activity is first created. */
Button btnClick;
CustomDialog cd;
@Override
public void onCreate(Bundle savedInstanceState)
{
super.onCreate(savedInstanceState);
setContentView(R.layout.main);
btnClick = (Button)findViewById(R.id.btnDialog);
btnClick.setOnClickListener(new OnClickListener()
{
@Override
public void onClick(View arg0)
{
cd = new CustomDialog(Home.this);
cd.show();
Button btnDimiss = (Button)cd.findViewById(R.id.btnOk);
btnDimiss.setOnClickListener(new OnClickListener()
{
@Override
public void onClick(View arg0)
{
cd.dismiss();
}
});
}
});
}
}
Output:


Subscribe to:
Posts (Atom)